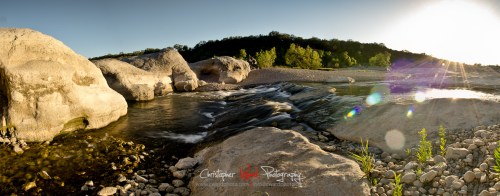
This is an image I took this last fall when I was in the Boundary waters. I was on a canoe trip with some friends, lugging my camera gear along the way. I even had a tripod with me, and took a few panoramas, but I had not processed any of them until now. As I put this one together, I thought I would give the Color Effects Pro 4 plugin from Nik a try. I had used V3 before, but not that regularly. I had a license key for V4 that I bought a few months ago on a sale, but had never installed it. I decided to download it and give it a whirl. Fantastic is all I can say. It’s great to be able to stack effects from right within the program. If I remember correctly, I did tonal contrast, brilliance/warmth, and polarizer. I am pretty pleased with the result. The sky looks more dramatic, the light on the trees came out, and the near shore was pulled out of the darkness. The only magic it couldn’t pull off was the top right corner. Lightroom says it’s not blown out, but if I tried to darken it, it would block up pretty bad. I decided to leave it alone. I think I might print this one.
Category Archives: Photography
Photographs from Old Delhi
I started posting some images from Nepal the other day, and I will get back to more of those, but I felt like getting some of my image from India up first. They are all from Old Delhi.
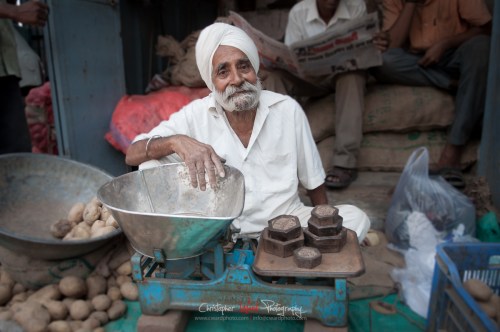
The person above is a chai tea brewer. He has a stall in a little market at the edge of a city dump in Chandni Chowk. As is typical of theses guys, he was outgoing, and gracious enough to let me take his picture. He was very excited that I would buy a chai from him. One of the best I have had, but I had to not pay attention to the cleanliness of the glass.
I found this gentleman next to the Chai stand. He was eying me very suspiciously. I hung out at the Chai stand for a while, before coming back and asking if I could take his picture. I smiled, and nodded to my camera, and he did the same. Suspicion mitigated.
Images from Nepal
This picture was taken in October 2010, and yet I am just finally getting to posting these images to the web. Not only this, but this is the first image I have processed in Lightroom 4 and posted to the internet. Woo hoo. Anyway, it has been a long time since I have been in Nepal, and I can’t believe I haven’t managed to get to processing my images. Never mind that this image, and the next several that I will post I already processed while I was in Nepal.
I was in Kathmandu, walking around the Boudhanath Stupa. I looked up and saw this monk. He was sitting at mid level of the Boudha Stupa overlooking the people below. I pulled out my 200mm lens, and took a few pictures before he noticed me. I felt I got a fairly stern look. I then whet up and showed him the back of my camera. He gave me the biggest smile.
Strobist shoot of Eddie and a 75 Nova
My friend Eddie and I headed up to Mounds View Park in St. Paul for a little evening photo shoot. I wanted to let you know how I took this shot.
First, we are in the twilight hour, just before the sun goes down. I decided not to meter this manually. I set the camera on aperture priority, with -1 2/3 exposure compensation. This is what is controlling the background exposure. For the lights, I used manual. I usually shoot in TTL, but I both wanted to experiment, and I knew that for the light on Eddie it was going to need pretty much full power.
I started with a SB800 speed light toward the front of the car, that is skipping across the side. I had one SB900 mounted on a stand to the left of the car in a 24″ lastolight softbox. This was pointed at Eddie. My 3rd light was on the camera, a SB900 acting as a commander. But, the back of the car was too dark, and as the light went down, I was able to switch to just the popup flash on my D7000. I was surprised, but happy that I had another light. I was out of stands, (only 2) so with only the foot, and pointed up at 45deg at the car, I lit up the back end of the car.
So, if you caught that, I am using the pop up flash on my camera to trigger the flashes in manual mode. The cool thing about this, is that I could change the power of the lights without going over to the units themselves. I would have had to do this in SU-4 mode. Instead I was able to adjust the power and settle on 1/4 power while staying at the camera.
The next issue was that I didn’t get enough power out of the flash on Eddie. I had it zoomed to 200mm, but it was fairly far back to stay out of the frame. (Shooting at 55mm if you were wondering). So, to fix it, I upped the ISO from 200 to 400. This gave me the power I was looking for from the flash, and we were good to go.
The rest was all composition. I think some of the best shots came from the low position when I was kneeling on the ground. The only issue is that you can’t really see the city in the background this way. Anyway, there are some other pictures on my portrait site.
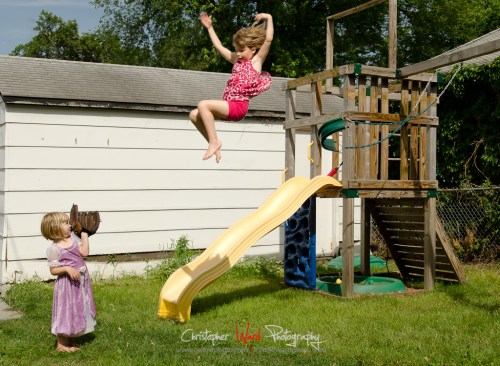
Lily catching Kate jumping from the swings
This is my first attempt at a composite using my girls as subjects. The inspiration for the photograph came from Justin and some of the pictures that he has created of his boys. I have been thinking of creating some more creative pictures of the girls for awhile, and have kept putting it off. This weekend I gave it a go. This is the first idea that I had.
I think the concept worked. I envisioned a picture of Kate flying through the air, and Lily trying to catch her. I gave her my ball glove to try to make it look like she was ready to catch. I had trouble getting Lily to look like she was nervous about being able to catch Kate. Kate’s jump worked well though. Also, to simplify, I went with a picture outside that I didn’t think needed flash. Most of Justin’s images are inside using flash, which I will move up to when I think of something good.
Technically there are a few problems. First is that Kate is blurry. I almost didn’t post this because of it, but decided to anyway. I learned that a kid jumping off a swing is faster than 640th of a second can freeze. Surprised me. I think I got the pictures aligned, but when I went to try to pose Lily, other kids kept looking in the camera and must have bumped it. (we had several over at the time) Also, there is a halo around Kate. I cut her out so I could move her up in the frame to make her look like the jump was higher. Every time I try to take someone off a natural setting I get this. I’ve got to get that figured out.
The other is the view. The kids are heavily weighted to the left of the frame. Not sure I like that. I did choose this angle on purpose though, and that was so that you only saw the garage in the background. I didn’t want to show the crap that is our parking pad and back lane. Thought it would be too distracting. I might try for a different location where I can get them perpendicular to the frame. Trick is to find that location where there aren’t a ton of other kids around.
Thoughts?
D7000 at 3200 ISO
I went to Wood Lake Park in Richfield on the Weekend. I got up at 5:00, and just got there in time to get a little bit of color. The sun is getting up earlier and earlier. It get’s harder and harder to beat the sun.
Anyway, it has been a while since I went to Wood Lake, so I decided to take the opportunity to get there this past Sunday morning. I was pretty happy with several of my shots. I got a few good ones of a muskrat, an egret, and some red wing black birds. It wasn’t until I got to my computer that I realized that I had taken all the shots at 3200 ISO. On the back of the camera the shots looked sharp, but back at the computer, not so much. Very disappointed.
I am actually fairly impressed with the combination of the D7000 and Lightroom 3’s ability to control noise. The images are fairly usable, but not as sharp as I want for a wildlife picture. This is not really the best way to judge the picture quality for how I intend to use 3200 ISO. I still need to take my own shots with a f/2.8 lens, 3200 ISO and a dim room.
So lesson learned? We will see. I need to double check settings before EVERY shoot.
How to set up Hipstamatic
I’ve been snapping away with my iPhone lately. The app I have been using the most is Hipstamatic. I started with a few issues that bugged me, so I wanted to tell you how I set it up. This is not how everyone needs to set their camera up, just what works for me.
Resolution: this was disappointing. I shot a ton of images that I was going to put in a small book. They were all at the default resolution of 600px. Nuts. Too small to print. It took a long time to figure out that you set the resolution via a sliding switch on the side of the lens. You need to turn the camera around and slide the lever to the left of the lens up. You now have full resolution.
Composition: this drove me nuts. Some people might like the retro like aspect of not knowing exactly what picture they are taking, but not me. I like to compose carefully. To fix this, you need to be in the Settings app, Hipstamatic section. Here change the Viewfinder Mode from Classic to Precision Framing.
Random changing film and lens: Again, maybe I am just not the target retro user of this app, but I don’t want the camera to randomly switch things on me when I shake the phone whether it’s accidental or deliberate. There are two ways to fix this. If you edit your lenses you can pick which lens you want it to pick on shake. Me, I use the sledgehammer approach and turned Shake to Randomize off completely in the settings app.
Metadata: if you want tags and GPS info to make it to your photo sharing sites, you also need to make sure that this is enabled in the settings app. I think this is on by default. You can also set this each time you post. The biggest issue I had to getting this to work on flickr was that I had blocked this feature on the flickr account settings. Go figure.
Now, the reason I started and continue to shoot with this app is one lens and film combo. I saw Josh Bradley using this when he took the portrait that I am using in twitter and Facebook. I downloaded them right away. I use the BlacKeys Ultrachrome B+W film and the Lucifer VI lens. You can get them both in the Portland Hipstapak. It will cost you a couple of dollars via in app purchase. Its the only combo I am using. I know I should be more adventurous.
Anyway, this app is all about fun, so have fun taking pictures.
Guadalupe River Cypress Trees
Well, how about that, another panorama. This one is from the Guadalupe River. I worked this one area for a long time. Really until the light was very hard and bright. I had trouble getting much I liked. Most of what I liked were ones I converted to black and white. I’ll show those another time. This panorama was taken at the end of our time shooting at the park. I had just about quite, when I saw Josh taking a pano, and I thought, yikes, I almost forgot to take one of those. I had taken several shots across the river about here, but nothing this wide. Truth be told, I pretty much planted the tripod in the holes of where Josh was. Here was his shot. I decided to convert mine to B/W with a sepia tone. I am really liking Nik Silver Effects Pro 2.
Pedernales River Panorama
This has turned into pano week around here. Here is another panorama that I made in Texas of the Pedernales river. This one isn’t quite so wide. I was constrained by the position I chose across from the mini falls here. The big rock on the left and the sun on the right.
Anyway, the Pedernales river was running really low. Very little water. I was told that there was usually a fair bit more water running in the spring. The river basin is quite wide too. One of my earlier panoramas was shot in the opposite direction and shows just how wide it is. The reason for this is flash flooding. It is such a common occurrence, and the water can change so rapidly that there is a sign up at the trail head that shows a before and after picture that is only 5 min apart. The before shows a fairly lazy river, and the after a massive rushing torrent. Pretty crazy.
A Panorama of Josh teaching how to take Panoramas
This is continuing my series of really boring blue sky panoramas. This time I figured that if I didn’t have a really great sky, I would include a bunch of people. Josh Bradley is giving a little presentation on how to take panoramas here. I figured I might as well take pictures of him. I didn’t listen, but I imagine that he would likely have told them:
- Don’t include the sun – oops
- Don’t use a polarizer – oops
- Don’t include people – oops
You never know. Actually, those may or may not be somebody’s rules, but you never know, your picture might be great by breaking the rules.
In this case, I didn’t expose for the sun, I exposed for the people in the middle of the photograph, and let the parts with the sun blow out. I used a little dodging in lightroom to darken some of the left side to help compensate. I also shot at f/13 to try to get that star pattern. I would have liked to close down a little bit more, but my shutter was at 1/60th and with people in the shot I didn’t want to go slower.
I forgot to take off my polarizer. It was obvious in yesterdays post with the very dark sky in the center of the image. In this image, because I never got 90deg away from the sun where the effect of the effect of the polarizer on the sky would be greatest, the sky doesn’t look as blotchy as it could have.
Sometimes people in a panorama can work, but you need to be careful. I took 3 different ones, and in the other two, people were moving around, and the merge in photoshop lopped off parts of people. It would have taken a lot of extra work to use those ones by painting on the masks to reveal the parts of the people I wanted.
In all seriousness, the biggest tip I have when taking a panorama is to level the tripod. This is not the same as leveling the camera. The little bubble on the top of the tripod head, or those little attachments you put on the hotshoe level the camera. You need to level the tripod. Some tripods like my Induro have a little round bubble level at the base of where the tripod head mounts. I loosen the legs a little, and slowly push down on two of them until I get the tripod level. Now when you turn the head, it won’t move up or down as you are turning. Now, if you choose, you could tilt your tripod up or down to get the composition you are looking for. You don’t want it tilted left or right, so use your bubble level in the tripod head or the device in the hot shoe to make sure it isn’t leaning.
Go shoot panos. And for the love of all tripods that are level, try to pick out at least one cloud in the sky.


